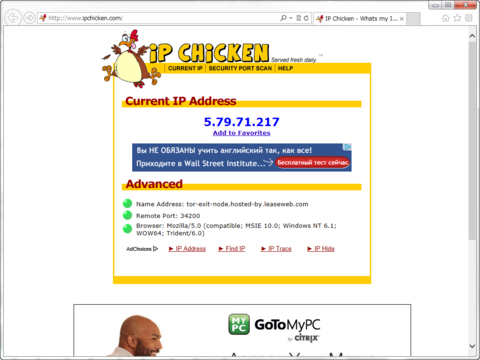
Raspberry Pi を2台購入し、1台は Nagios によるサーバー監視マシン。もう1台は、何にするかと Raspbmc で遊んでみたり、いろいろ試したのですが、実用的なものがいいので、Torを動かす onion pi を作りました。
Torとは何ぞやという話はWikipediaを見ていただくとして、Tor 自体は、パソコンにインストールすれば簡単に使えるのですが、そのインストールすらしたくない、スマホでもTor経由の極秘な通信をしたい場合は、他のPCにインストールするしかありません。onion pi は自らがTor内蔵のWiFiルーターとなり、手元のPCにはWiFiの接続設定をするだけですべてのTCP通信がTor経由で行われるというものです。ブラウザだけではなくTCPを用いる、メール等もTor経由になります。
以下、製作メモ。手順。
必要なもの
・Raspberry Pi 本体
・4GB以上のSDカード
・MicroUSB端子のケーブル、充電器
・LANケーブル
・WiFi USBアダプタ ( BUFFALO WLI-UC-GNM )
・USBキーボード
・HDMIケーブル
・テレビ
・SDカードリーダー
・すでにインターネット接続可能な状態であること
BUFFALO WLI-UC-GNM 用手順(俺様用)
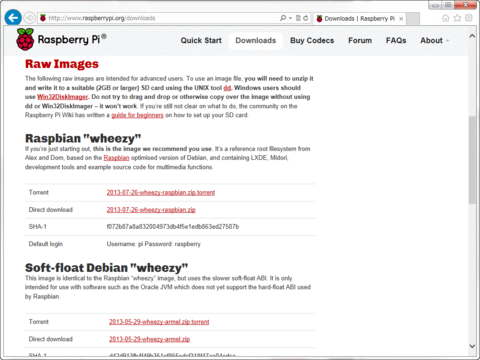
・Raspberri Pi のダウンロードページから、Raspbian "wheezy"をダウンロードします。
執筆時点の最新版は 2013-07-26-wheezy-raspbian.zip
・2013-07-26-wheezy-raspbian.zipを解凍します。
2013-07-26-wheezy-raspbian.imgが解凍されます。
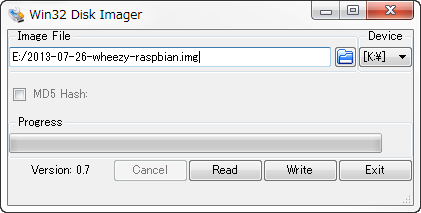
・手持ちの Windows PC で Win32DiskImager.exe を用い、2013-07-26-wheezy-raspbian.img をSDカードに書き込みます。
※うちの環境では最新版は動かず、v0.7が正常動作しました。
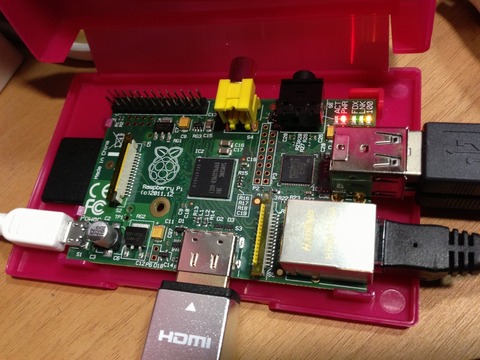
・Raspberry Pi にSDカードを挿入しケーブルを接続します。
まず、以下を挿入または接続します。
2013-07-26-wheezy-raspbian.imgを書き込んだSDカード
HDMIケーブル
LANケーブル
USB用WiFiアダプタ
USBキーボード
最後にmicroUSBを接続し、電源を入れます。
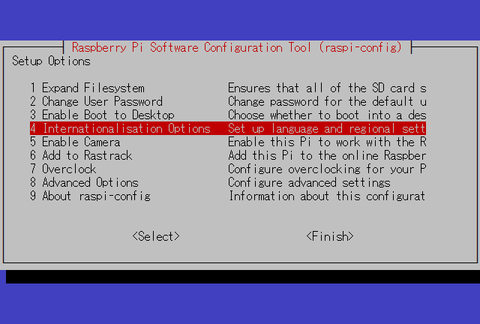
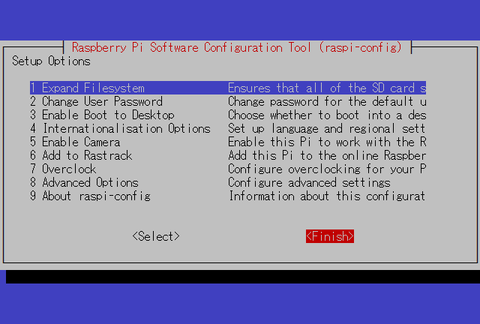
・しばらくして、テレビの画面に以下のような表示が現れれば、SDカードへのイメージ書込みは成功です。
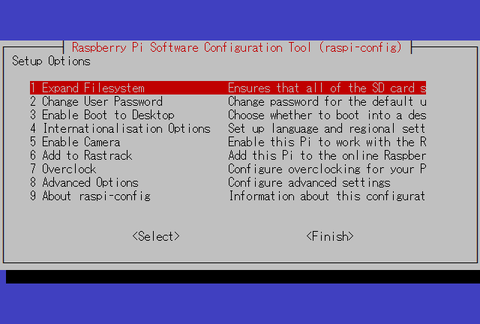
・まず最初に、使用しているSDカードの全領域を確保するために、1を選択します。しばらくして、下記の表示が現れれば成功です。

・言語設定を行うため、1を選択します。
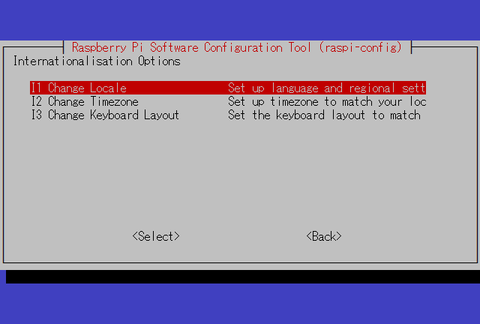
・画面をスクロールし、下記三つの言語を選択し OK を押します。
en_GB.UTF-8
ja_JP.EUC-JP
ja_JP.UTF-8
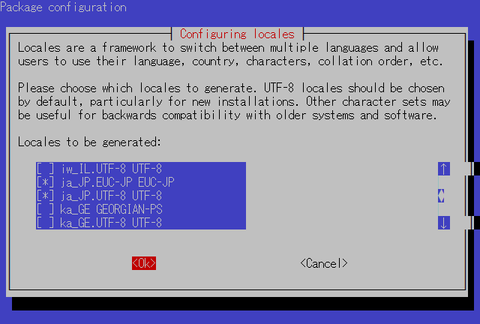
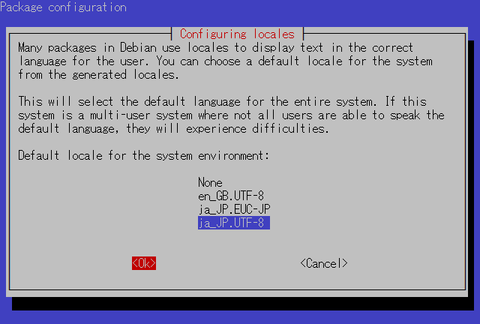
・デフォルトの言語は、ja_JP.UTF-8を選択し、OK を押します。
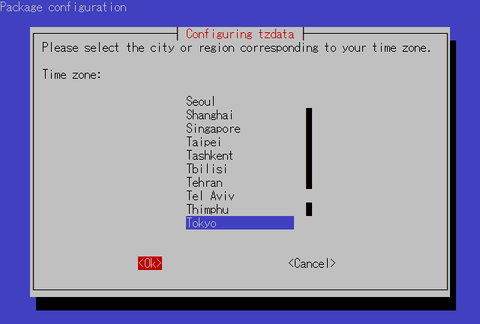
・Geographic area から Asia を選択し、Time zone として、Tokyo を選択します。

・新しいホスト名を設定します。下図では onionpi としています。

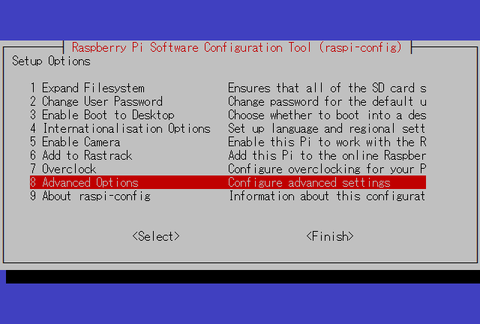
・グラフィックに割り当てるメモリの設定を行うため、3を設定します。
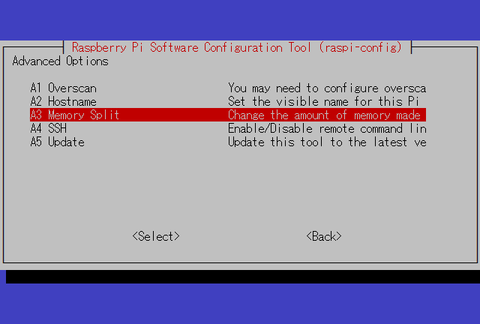
・トップ画面で Finish を選択し、再起動を促されるので、再起動します。

・IPアドレスを確認します。
再起動が終わり、ログインプロンプトがでたとき、その上に、IPアドレスが表示されています。
| [ ok ] Starting system message bus: dbus. [ ok ] starting NTP server: ntpd. [ ok ] Starting OpenBSD Secure Shell server: sshd. My IP address is 192.168.xxx.xxx Debian GNU/Linux 7 onionpi tty1 onionpi login: _ |
・ログインします。
ここからはテレビの画面は使いません。別のPCで作業を行います。
テレビの画面に表示されたIPアドレスへPCからTeraTerm等でSSHで接続します。通常のパスワード認証です。
ID : pi
Password : raspberry
・rootパスワードを作成します。
| pi@onionpi ~ $ sudo passwd root 新しいUNIXパスワードを入力してください: 新しいUNIX パスワードを再入力してください: passwd: パスワードは正しく更新されました |
・rootになります。
| pi@onionpi ~ $ su - パスワード: |
・ユーザー onion を作成し、パスワードを設定します。
| root@onionpi:~# useradd -m -s /bin/bash onion root@onionpi:~# passwd onion 新しいUNIXパスワードを入力してください: 新しいUNIX パスワードを再入力してください: passwd: パスワードは正しく更新されました |
・rootログイン禁止、パスワード認証禁止、チャレンジレスポンス認証を許可します。
| root@onionpi:~# cp -ip /etc/ssh/sshd_config /etc/ssh/sshd_config.org root@onionpi:~# cat /etc/ssh/sshd_config.org | sed -e 's/PermitRootLogin yes/PermitRootLogin no/' | sed -e 's/#PasswordAuthentication yes/PasswordAuthentication no/' | sed -e 's/ChallengeResponseAuthentication no/ChallengeResponseAuthentication yes/' > /etc/ssh/sshd_config root@onionpi:~# diff /etc/ssh/sshd_config /etc/ssh/sshd_config.org 27c27 < PermitRootLogin no --- > PermitRootLogin yes 48c48 < ChallengeResponseAuthentication yes --- > ChallengeResponseAuthentication no 51c51 < PasswordAuthentication no --- > #PasswordAuthentication yes |
・sshdを再起動します。
| root@onionpi:~# service ssh restart [ ok ] Restarting OpenBSD Secure Shell server: sshd. |
・キーボード設定を変更します。
| root@onionpi:~# cp -ip /etc/default/keyboard /etc/default/keyboard.org root@onionpi:~# vi /etc/default/keyboard |
| # KEYBOARD CONFIGURATION FILE
# Consult the keyboard(5) manual page. XKBMODEL="jp106" |
・ ll ( ls -l ) を利用可能にします。
| root@onionpi:~# cd root@onionpi:~# vi .bashrc |
| 下記行先頭の # を外す # alias ll='ls $LS_OPTIONS -l' |
| root@onionpi:~# vi /home/onion/.bashrc |
| 下記行先頭の # を外す #alias ll='ls -l' |
・仮想端末の一部を無効化します。
| root@onionpi:~# cp -ip /etc/inittab /etc/inittab.org root@onionpi:~# vi /etc/inittab |
| ※下記記述行をコメントアウト 2:23:respawn:/sbin/getty 38400 tty2 3:23:respawn:/sbin/getty 38400 tty3 4:23:respawn:/sbin/getty 38400 tty4 5:23:respawn:/sbin/getty 38400 tty5 6:23:respawn:/sbin/getty 38400 tty6 |
| root@onionpi:~# diff /etc/inittab /etc/inittab.org 55,59c55,59 < #2:23:respawn:/sbin/getty 38400 tty2 < #3:23:respawn:/sbin/getty 38400 tty3 < #4:23:respawn:/sbin/getty 38400 tty4 < #5:23:respawn:/sbin/getty 38400 tty5 < #6:23:respawn:/sbin/getty 38400 tty6 --- > 2:23:respawn:/sbin/getty 38400 tty2 > 3:23:respawn:/sbin/getty 38400 tty3 > 4:23:respawn:/sbin/getty 38400 tty4 > 5:23:respawn:/sbin/getty 38400 tty5 > 6:23:respawn:/sbin/getty 38400 tty6 |
・パフォーマンス(メモリ)調整
| root@onionpi:~# cp -ip /etc/sysctl.conf /etc/sysctl.conf.org root@onionpi:~# vi /etc/sysctl.conf |
| 28行目を有効にします。 net.ipv4.ip_forward=1 最下行に追記 # Performance tuning vm.swappiness = 0 vm.dirty_expire_centisecs = 48000 vm.dirty_writeback_centisecs = 24000 |
| root@onionpi:~# diff /etc/sysctl.conf /etc/sysctl.conf.org 28c28 < net.ipv4.ip_forward=1 --- > #net.ipv4.ip_forward=1 65,68d64 < # Performance tuning < vm.swappiness = 0 < vm.dirty_expire_centisecs = 48000 < vm.dirty_writeback_centisecs = 24000 |
・fstab変更 /tmp等を tmpfsへ
| root@onionpi:~# cp -ip /etc/fstab /etc/fstab.org root@onionpi:~# vi /etc/fstab |
| 下記を追記 tmpfs /tmp tmpfs defaults,size=16m 0 0 tmpfs /var/tmp tmpfs defaults,size=8m 0 0 |
| root@onionpi:~# diff /etc/fstab /etc/fstab.org 5,6d4 < tmpfs /tmp tmpfs defaults,size=16m 0 0 < tmpfs /var/tmp tmpfs defaults,size=8m 0 0 |
・ファームウェアバージョン確認
| root@onionpi:~# /opt/vc/bin/vcgencmd version Jun 17 2013 20:43:10 Copyright (c) 2012 Broadcom version d380dde43fe729f043befb5cf775f99e54586cde (clean) (release) |
・ファームウェアバージョンアップ
| root@onionpi:~# rpi-update ・・・(しばらく待つ)・・・ *** Running ldconfig *** Storing current firmware revision *** Syncing changes to disk *** If no errors appeared, your firmware was successfully setup *** A reboot is needed to activate the new firmware |
・ntpdドリフトファイルを/tmpへ配置します。
| root@onionpi:~# cp -ip /etc/ntp.conf /etc/ntp.conf.org root@onionpi:~# cat /etc/ntp.conf.org | sed -e 's/\/var\/lib\/ntp\/ntp.drift/\/tmp\/ntp.drift/' > /etc/ntp.conf root@onionpi:~# diff /etc/ntp.conf /etc/ntp.conf.org 3c3 < driftfile /tmp/ntp.drift --- > driftfile /var/lib/ntp/ntp.drift |
・再起動します。
| root@onionpi:~# reboot |
・再起動後、新しいユーザーでログインします。
チャレンジレスポンス認証になっていることに注意
ID : onion
Password :
・rootになります。
| onion@onionpi ~ $ su - パスワード: |
・ファームウェアのバージョンが上がっているか確認
| root@onionpi:~# /opt/vc/bin/vcgencmd version Aug 7 2013 16:17:34 Copyright (c) 2012 Broadcom version 7c7b17433e2a63025f6f42adcb2b8766eff55e12 (clean) (release) |
・アカウント名 pi をロックします。
| root@onionpi:~# passwd -l pi passwd: パスワード期限切れ情報を変更しました |
・パッケージ管理システムの最新パッケージリストをダウンロードします。
| root@onionpi:~# apt-get update ・・・(しばらく待つ)・・・ パッケージリストを読み込んでいます... 完了 |
・アップデート可能なパッケージをアップデートします。
| root@onionpi:~# apt-get upgrade パッケージリストを読み込んでいます... 完了 依存関係ツリーを作成しています 状態情報を読み取っています... 完了 以下のパッケージはアップグレードされます: gnupg gpgv libgcrypt11 linux-libc-dev アップグレード: 4 個、新規インストール: 0 個、削除: 0 個、保留: 0 個。 3,192 kB のアーカイブを取得する必要があります。 この操作後に追加で 5,120 B のディスク容量が消費されます。 続行しますか [Y/n]? Y ・・・(しばらく待つ)・・・ |
・ WiFiルーターに必要なパッケージをインストールします。
| root@onionpi:~# apt-get install hostapd isc-dhcp-server isc-dhcp-server (4.2.2.dfsg.1-5+deb70u6) を設定しています ... Generating /etc/default/isc-dhcp-server... [FAIL] Starting ISC DHCP server: dhcpd[....] check syslog for diagnostics. ... failed! failed! invoke-rc.d: initscript isc-dhcp-server, action "start" failed. |
・ WiFi向けのDHCP設定を行います。
| root@onionpi:~# cp -ip /etc/dhcp/dhcpd.conf /etc/dhcp/dhcpd.conf.org root@onionpi:~# vi /etc/dhcp/dhcpd.conf |
| 13,14行目をコメントアウトします。 #option domain-name "example.org"; #option domain-name-servers ns1.example.org, ns2.example.org; 21行目を有効にします。 authoritative; 最下行に追記します。 subnet 192.168.42.0 netmask 255.255.255.0 { range 192.168.42.10 192.168.42.50; option broadcast-address 192.168.42.255; option routers 192.168.42.1; default-lease-time 600; max-lease-time 7200; option domain-name "local"; option domain-name-servers 8.8.8.8, 8.8.4.4; } |
| root@onionpi:~# diff /etc/dhcp/dhcpd.conf /etc/dhcp/dhcpd.conf.org 13,14c13,14 < #option domain-name "example.org"; < #option domain-name-servers ns1.example.org, ns2.example.org; --- > option domain-name "example.org"; > option domain-name-servers ns1.example.org, ns2.example.org; 21c21 < authoritative; --- > #authoritative; 108,116d107 < subnet 192.168.42.0 netmask 255.255.255.0 { < range 192.168.42.10 192.168.42.50; < option broadcast-address 192.168.42.255; < option routers 192.168.42.1; < default-lease-time 600; < max-lease-time 7200; < option domain-name "local"; < option domain-name-servers 8.8.8.8, 8.8.4.4; < } root@onionpi:~# cp -ip /etc/default/isc-dhcp-server /etc/default/isc-dhcp-server.org root@onionpi:~# vi /etc/default/isc-dhcp-server |
| 21行目を下記にします。 INTERFACES="wlan0" |
| root@onionpi:~# diff /etc/default/isc-dhcp-server /etc/default/isc-dhcp-server.org 21c21 < INTERFACES="wlan0" --- > INTERFACES="" |
・ネットワークインターフェースの設定を行います。
| root@onionpi:~# cp -ip /etc/network/interfaces /etc/network/interfaces.org root@onionpi:~# vi /etc/network/interfaces |
| auto lo
iface lo inet loopback iface wlan0 inet static up iptables-restore < /etc/iptables.ipv4.nat |
・wlan0の動作確認をします。
| root@onionpi:~# ifconfig wlan0 192.168.42.1 root@onionpi:~# ifconfig wlan0 wlan0 Link encap:イーサネット ハードウェアアドレス 10:6f:3f:xx:xx:xx inetアドレス:192.168.42.1 ブロードキャスト:192.168.42.255 マスク:255.255.255.0 UP BROADCAST MULTICAST MTU:1500 メトリック:1 RXパケット:0 エラー:0 損失:0 オーバラン:0 フレーム:0 TXパケット:0 エラー:0 損失:0 オーバラン:0 キャリア:0 衝突(Collisions):0 TXキュー長:1000 RXバイト:0 (0.0 B) TXバイト:0 (0.0 B) |
・WiFiルーターとしての設定を行います。
※ BUFFALO WLI-UC-GNM を基に設定しています。
ssidやwpa_passphraseはお好きな文字列を指定してください。
| root@onionpi:~# vi /etc/hostapd/hostapd.conf |
|
interface=wlan0 driver=nl80211 ssid=【任意のSSID】 country_code=JP ieee80211d=1 hw_mode=g channel=1 macaddr_acl=0 auth_algs=1 ignore_broadcast_ssid=0 ieee80211n=1 wpa=2 wpa_passphrase=【任意のKEY】 wpa_key_mgmt=WPA-PSK wpa_pairwise=TKIP rsn_pairwise=CCMP wmm_enabled=1 |
| root@onionpi:~# cp -ip /etc/default/hostapd /etc/default/hostapd.org root@onionpi:~# vi /etc/default/hostapd |
| 10行目を下記にする。 DAEMON_CONF="/etc/hostapd/hostapd.conf" |
| root@onionpi:~# diff /etc/default/hostapd /etc/default/hostapd.org 10c10 < DAEMON_CONF="/etc/hostapd/hostapd.conf" --- > #DAEMON_CONF="" |
・iptable の設定を行います。
| root@onionpi:~# vi /tmp/iptables.sh |
| iptables -F INPUT iptables -F OUTPUT iptables -F FORWARD iptables -t nat -A POSTROUTING -o eth0 -j MASQUERADE iptables -t nat -A PREROUTING -i wlan0 -p udp --dport 53 -j REDIRECT --to-ports 53 iptables -t nat -A PREROUTING -i wlan0 -p tcp --syn -j REDIRECT --to-ports 9040 iptables -A FORWARD -i eth0 -o wlan0 -m state --state RELATED,ESTABLISHED -j ACCEPT iptables -A FORWARD -i wlan0 -o eth0 -j ACCEPT |
| root@onionpi:~# sh /tmp/iptables.sh & root@onionpi:~# iptables -t nat -S -P PREROUTING ACCEPT -P INPUT ACCEPT -P OUTPUT ACCEPT -P POSTROUTING ACCEPT -A PREROUTING -i wlan0 -p udp -m udp --dport 53 -j REDIRECT --to-ports 53 -A PREROUTING -i wlan0 -p tcp -m tcp --tcp-flags FIN,SYN,RST,ACK SYN -j REDIRECT --to-ports 9040 -A POSTROUTING -o eth0 -j MASQUERADE root@onionpi:~# iptables -S -P INPUT ACCEPT -P FORWARD ACCEPT -P OUTPUT ACCEPT -A FORWARD -i eth0 -o wlan0 -m state --state RELATED,ESTABLISHED -j ACCEPT -A FORWARD -i wlan0 -o eth0 -j ACCEPT root@onionpi:~# iptables-save > /etc/iptables.ipv4.nat root@onionpi:~# ll /etc/iptables.ipv4.nat -rw-r--r-- 1 root root 740 8月 14 20:57 /etc/iptables.ipv4.nat root@onionpi:~# cat /etc/iptables.ipv4.nat # Generated by iptables-save v1.4.14 on Wed Aug 14 20:57:10 2013 *nat :PREROUTING ACCEPT [32:2252] :INPUT ACCEPT [32:2252] :OUTPUT ACCEPT [19:1444] :POSTROUTING ACCEPT [0:0] -A PREROUTING -i wlan0 -p udp -m udp --dport 53 -j REDIRECT --to-ports 53 -A PREROUTING -i wlan0 -p tcp -m tcp --tcp-flags FIN,SYN,RST,ACK SYN -j REDIRECT --to-ports 9040 -A POSTROUTING -o eth0 -j MASQUERADE COMMIT # Completed on Wed Aug 14 20:57:10 2013 # Generated by iptables-save v1.4.14 on Wed Aug 14 20:57:10 2013 *filter :INPUT ACCEPT [138:9088] :FORWARD ACCEPT [0:0] :OUTPUT ACCEPT [93:11988] -A FORWARD -i eth0 -o wlan0 -m state --state RELATED,ESTABLISHED -j ACCEPT -A FORWARD -i wlan0 -o eth0 -j ACCEPT COMMIT # Completed on Wed Aug 14 20:57:10 2013 |
・WiFiルーター起動
| root@onionpi:~# service hostapd start [ ok ] Starting advanced IEEE 802.11 management: hostapd. root@onionpi:~# service isc-dhcp-server start [ ok ] Starting ISC DHCP server: dhcpd. root@onionpi:~# service hostapd status [ ok ] hostapd is running. root@onionpi:~# service isc-dhcp-server status Status of ISC DHCP server: dhcpd is running. root@onionpi:~# update-rc.d hostapd enable update-rc.d: using dependency based boot sequencing root@onionpi:~# update-rc.d isc-dhcp-server enable update-rc.d: using dependency based boot sequencing |
・不要ファイル削除(移動)
| root@onionpi:~# ll /usr/share/dbus-1/system-services/fi.epitest.hostap.WPASupplicant.service -rw-r--r-- 1 root root 160 11月 13 2012 /usr/share/dbus-1/system-services/fi.epitest.hostap.WPASupplicant.service root@onionpi:~# mv /usr/share/dbus-1/system-services/fi.epitest.hostap.WPASupplicant.service ~/ root@onionpi:~# ll fi.epitest.hostap.WPASupplicant.service -rw-r--r-- 1 root root 160 11月 13 2012 fi.epitest.hostap.WPASupplicant.service root@onionpi:~# rm /tmp/iptables.sh root@onionpi:~# ll /tmp/iptables.sh ls: /tmp/iptables.sh にアクセスできません: そのようなファイルやディレクトリはありません |
・Torインストール
| root@onionpi:~# apt-get install tor パッケージリストを読み込んでいます... 完了 依存関係ツリーを作成しています 状態情報を読み取っています... 完了 以下の特別パッケージがインストールされます: tor-geoipdb torsocks 提案パッケージ: mixmaster xul-ext-torbutton socat tor-arm polipo privoxy apparmor-utils 以下のパッケージが新たにインストールされます: tor tor-geoipdb torsocks アップグレード: 0 個、新規インストール: 3 個、削除: 0 個、保留: 0 個。 2,694 kB のアーカイブを取得する必要があります。 この操作後に追加で 7,386 kB のディスク容量が消費されます。 続行しますか [Y/n]? Y ・・・(しばらく待つ)・・・ tor (0.2.3.25-1) を設定しています ... [ ok ] Starting tor daemon...done. torsocks (1.2-3) を設定しています ... tor-geoipdb (0.2.3.25-1) を設定しています ... root@onionpi:~# cp -ip /etc/tor/torrc /etc/tor/torrc.org |
| ファイル先頭に下記を追加 Log notice file /var/log/tor/notices.log VirtualAddrNetwork 10.192.0.0/10 AutomapHostsSuffixes .onion,.exit AutomapHostsOnResolve 1 TransPort 9040 TransListenAddress 192.168.42.1 DNSPort 53 DNSListenAddress 192.168.42.1 |
| root@onionpi:~# diff /etc/tor/torrc /etc/tor/torrc.org 1,8d0 < Log notice file /var/log/tor/notices.log < VirtualAddrNetwork 10.192.0.0/10 < AutomapHostsSuffixes .onion,.exit < AutomapHostsOnResolve 1 < TransPort 9040 < TransListenAddress 192.168.42.1 < DNSPort 53 < DNSListenAddress 192.168.42.1 |
・Tor ログファイル設定
| root@onionpi:~# touch /var/log/tor/notices.log root@onionpi:~# chown debian-tor /var/log/tor/notices.log root@onionpi:~# chmod 644 /var/log/tor/notices.log root@onionpi:~# ls -l /var/log/tor 合計 4 -rw-r--r-- 1 debian-tor adm 2259 8月 14 20:41 log -rw-r--r-- 1 debian-tor adm 0 8月 14 20:43 notices.log |
・Tor起動
| root@onionpi:~# service tor restart [ ok ] Stopping tor daemon...done. [ ok ] Starting tor daemon...done. root@onionpi:~# service tor status [ ok ] tor is running. root@onionpi:~# update-rc.d tor enable update-rc.d: using dependency based boot sequencing |
・Raspberry Pi 本体からキーボードを外す
・システム再起動
| root@onionpi:~# reboot |
・確認
自分のIPアドレスを確認。http://www.ipchicken.com/
設定したSSID、KEYでPCやスマホ等からWiFiでつながるか?
WiFi接続後、もう一度IPアドレスを確認し先ほどとは異なっている事。
多くのTorの出口ノードのホスト名はtorの文字があるので参考にするとよい。
参考:Onion Pi
